Unlocking Precision and Charm with the Cute Owl 3D Design SVG
The allure of layered paper crafting lies in its ability to transform flat materials into dimensional art, and few subjects capture the imagination quite like a whimsical owl. When you dive into the world of the Cute Owl 3D Design SVG, you are not just downloading a file; you are accessing a blueprint for creativity that spans from beginner hobbyists to seasoned small business owners. However, the journey from download to finished product is often where things can go sideways if you aren't paying attention to the details. Many crafters rush into cutting without fully understanding the file structure or the specific requirements of their machines, leading to wasted material and frustration. By taking a moment to understand what makes this design unique and how to approach it correctly, you can ensure your final project looks professional and polished.
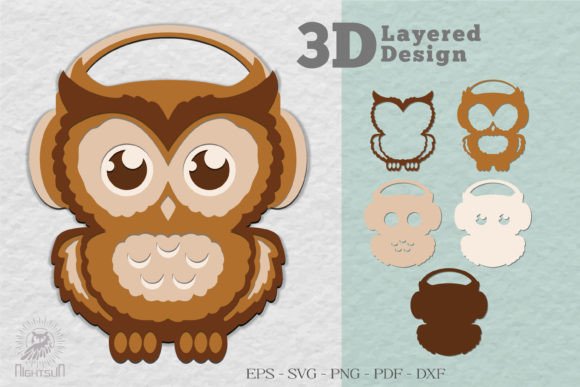
One of the most common misunderstandings revolves around the sheer variety of formats included in a comprehensive bundle. When you acquire a high-quality package, you typically receive a suite of files: SVG for cutting, AI CS6, EPS, High Quality PNG, PDF, and DXF. A frequent mistake beginners make is attempting to use the wrong file type for their specific software or hardware. For instance, trying to import an AI CS6 file directly into a basic web-based cutter without proper conversion can result in lost layers or distorted paths. The SVG format is generally the gold standard for cutting machines like Cricut or Silhouette because it preserves vector data cleanly. If you skip over the DXF file when using older software versions, you might find your cut lines are jagged or incomplete. Always match the file extension to your machine's compatibility list before you even think about loading your mat.
Navigating Layer Complexity and Assembly
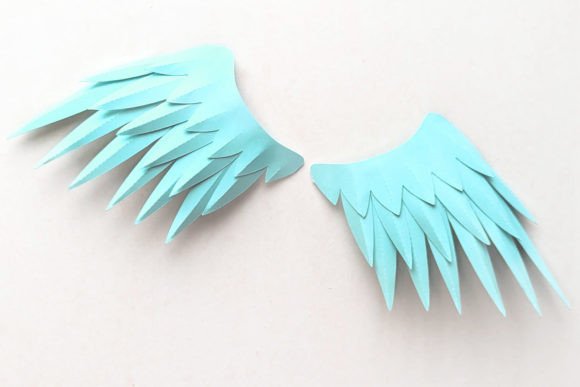
The "3D" aspect of this design implies depth, which means the file is constructed with multiple overlapping layers. A significant pitfall for many creators is underestimating the assembly process. Unlike a single-layer silhouette, a 3D owl requires precise alignment during both the digital setup and the physical gluing phase. Some users inadvertently delete essential shadow layers or spacing elements while trying to "simplify" the design in their software. This often happens when people assume that fewer layers mean easier cutting. In reality, those subtle offset layers are what create the illusion of depth. If you remove them, your owl will look flat and lifeless, defeating the purpose of choosing a 3D design in the first place.
To avoid this, take time to inspect the High Quality PNG preview included in your download. This raster image serves as a visual guide for how the layers should stack. Before sending anything to your cutter, ungroup the elements in your design software and color-code each layer. This simple step allows you to visualize the stacking order and ensures you don't miss a critical piece. Furthermore, consider the material thickness. If you are using heavy cardstock, the adhesive bulk can throw off your alignment. A better approach is to test with lighter weight paper first or adjust your digital offset slightly to compensate for the physical thickness of your chosen medium. This attention to detail separates a amateur-looking craft from a boutique-quality item.
Material Selection and Cutting Settings
Another area where enthusiasts often stumble is material selection. The Cute Owl 3D Design SVG features intricate details, particularly around the feathers and eyes. Using a material that is too thick or fibrous can lead to tearing or incomplete cuts, especially in those delicate areas. Conversely, using paper that is too thin might result in a flimsy structure that cannot support its own weight when layered. It is crucial to perform a test cut on a scrap piece of your intended material. Do not assume that the settings you used for a different project will work here. Every design has unique density requirements.
When working with the EPS or PDF files for print-and-cut projects, color management becomes vital. A common error is ignoring the color profile differences between your screen and your printer. What looks like a soft pastel blue on your monitor might print as a muddy gray if your printer settings are not calibrated. Always check the High Quality PNG against your printed proof before committing to a full run. For entrepreneurs selling these designs, consistency is key to brand reputation. A customer expecting the vibrant colors shown in the listing will be disappointed if the final product looks washed out due to poor file handling.
- Check Layer Integrity: Ensure no paths are open or broken before cutting.
- Verify Scale: Confirm the dimensions match your project requirements to avoid resizing issues that distort line weights.
- Review Licensing: Understand whether your purchase allows for commercial use if you plan to sell finished goods.
- Organize Files: Keep your AI, EPS, and SVG folders distinct to prevent version confusion later.
For educators and workshop leaders, teaching the proper workflow is just as important as the design itself. When guiding students or clients, emphasize the importance of the DXF file for compatibility with legacy systems, while encouraging the use of SVG for modern workflows. Miscommunication about which file to use can halt a classroom project or delay a client order. By establishing a clear protocol for file selection and material testing, you streamline the creative process and reduce waste.
Ultimately, the value of the Cute Owl 3D Design SVG lies not just in the cute aesthetic, but in the precision engineering of the vector paths. Whether you are creating a nursery decoration, a greeting card, or a complex scrapbook layout, the quality of your output depends on how well you respect the file's structure. Avoid the temptation to rush. Take the time to understand the layers, choose the right materials, and select the appropriate file format for your tools. By correcting these common oversights and adopting a methodical approach, you empower yourself to create stunning, dimensional art that stands out. The difference between a good project and a great one is often found in the details you choose to honor rather than overlook.