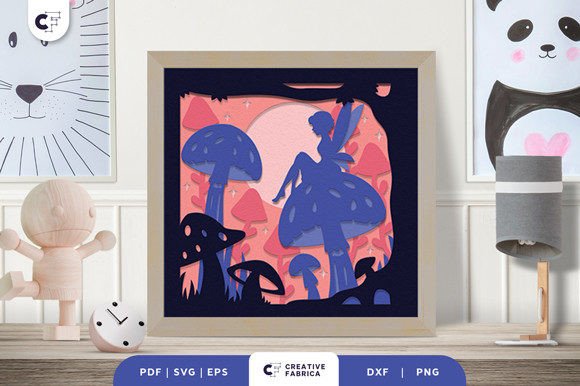
Fairy with Red Mushroom 3D Shadow Box Guide
There is a specific kind of magic that happens when flat paper transforms into a dimensional world. For crafters, designers, and small business owners looking to add depth to their projects, the Fairy with Red Mushroom 3D Shadow Box offers a perfect blend of whimsy and technical satisfaction. This isn't just a cut file; it is a masterpiece designed to bring your wildest fantasy to life through layers of carefully engineered cardstock. Whether you are a beginner picking up your Cricut for the first time or a seasoned entrepreneur stocking shelves for a boutique, this design provides a tangible connection to the adventure of a fairytale story.
At its core, this project features an intricate 3D design of a fairy sitting gracefully on a giant mushroom. The appeal lies in the details. Unlike simple silhouettes, this SVG utilizes seven distinct layers to create shadows, highlights, and a sense of volume that draws the eye in. When assembled, the result is a miniature diorama that feels alive. The red mushroom cap serves as a vibrant focal point, contrasting beautifully with the delicate wings of the fairy and the textured ground beneath. It is a piece of art that invites viewers to lean in and explore every nook and cranny of the scene.
Why This Design Stands Out for Creators
The primary value of the Fairy on Giant Mushroom 3D SVG is its versatility wrapped in ease of use. Many 3D paper crafts can be intimidating, requiring complex folding or advanced engineering skills. However, this design simplifies the process without sacrificing quality. You do not need specialized machinery beyond a standard cutting machine like a Cricut or Silhouette. The heavy lifting regarding design complexity has already been done for you. Your role is to bring it to life using basic adhesives such as PVA glue.
For educators and parents, this project serves as an excellent gateway into the world of papercrafting. It teaches patience, layering logic, and fine motor skills. For professionals, it represents a high-value product that can be sold as a finished good or as part of a DIY kit. The "wow" factor of a 3D shadow box often commands a higher price point than flat cards or decals, making it a smart choice for those looking to maximize their creative income.
Ideal Applications and Use Cases
Understanding where to apply this design is key to getting the most out of it. Because the final size is approximately 20.32×20.32 cm (roughly 8x8 inches), it fits perfectly into standard deep-frame shadow boxes available at most craft stores. Here are several practical ways to utilize this asset:
- Nursery and Kids' Room Decor: The whimsical nature of a fairy on a mushroom makes it an ideal centerpiece for a child's bedroom. It adds a touch of wonder without being overwhelming.
- Greeting Cards and Invitations: While the full 7-layer version is best for wall art, you can adapt the layers to create stunning pop-up elements for birthday invitations or thank-you cards.
- Small Business Products: Craft entrepreneurs can assemble these in bulk using varying color palettes to sell at local markets or online shops. Seasonal variations, such as changing the mushroom to orange for autumn, can keep the product fresh.
- Educational Tools: Teachers can use the assembly process to demonstrate concepts of depth, perspective, and sequencing in art classes.
- Gift Giving: A handmade shadow box carries a sentimental weight that store-bought items rarely match. It is a thoughtful gift for fairy enthusiasts, gardeners, or anyone who loves fantasy literature.
Technical Specifications and File Compatibility
One of the strongest aspects of this digital download is its compatibility. When you acquire the Fairy with Red Mushroom 3D Shadow Box, you receive a comprehensive suite of file formats including SVG, PDF, EPS, PNG, and DXF. This ensures that no matter what software or hardware you use, you are covered.
The SVG and DXF files are optimized for cutting machines, ensuring clean cuts and accurate weeding paths. The PDF and EPS files are excellent for those who might want to scale the design manually or use it in vector illustration software like Adobe Illustrator. The inclusion of a PNG is helpful for quick previews or digital mockups before you commit to cutting physical paper. With seven specific layers designated, the file structure is logical, helping you organize your mats efficiently before sending the job to your cutter.
Material Selection for Best Results
The success of any 3D paper project hinges on the quality of the material used. Flimsy paper will sag over time, failing to hold the structural integrity required for the layers to stand apart. For this specific design, stiffness and texture are paramount. The recommended material is Encore Cardstock 80 lb cover (216 gsm). This weight provides the perfect balance: it is thick enough to hold its shape and support the weight of upper layers, yet thin enough to be cut cleanly by most consumer-grade machines without tearing.
Using high-quality cardstock also affects the visual finish. Thicker paper casts sharper shadows, enhancing the 3D effect that defines this project. If you are sourcing materials, looking for dedicated cardstock shops can ensure consistency in color and texture. For instance, visiting a specialized 12×12 Cardstock Shop can provide access to premium brands that elevate the final look of your shadow box. Note that while preview images show specific colors, the actual final product color may slightly vary due to lighting sources and the specific paper color you choose, allowing you to customize the mood of your piece.
Important Considerations Before You Start
Before diving into your project, there are a few practical things to consider to ensure a smooth crafting experience. First, understand that this is a layered assembly project. It requires patience. You will need to stack the seven layers sequentially, applying adhesive between each one. Foam tape or small squares of folded cardstock can be used as spacers if you want even more depth than the standard glue application provides.
Secondly, consider your framing early. Since the finished dimensions are fixed at roughly 20cm square, ensure you have a frame ready that accommodates this size with enough depth to house the layers without crushing them against the glass. A shadow box frame with at least 1.5 inches of depth is usually ideal.
Finally, remember that the images provided in the product listing are for preview purposes only. They serve to inspire, but your creativity drives the final outcome. Don't be afraid to experiment with metallic papers for the fairy's wings or textured papers for the mushroom stem. The digital file is merely the blueprint; your choice of materials turns it into a unique work of art.
Taking the first step on your journey into a world of wonder with this piece of art is simpler than it looks. With the right files, the correct cardstock weight, and a bit of patience, the Fairy with Red Mushroom 3D Shadow Box becomes more than just a craft project—it becomes a portal to a fairytale right in your home or shop. Whether you are crafting for joy or for profit, this design offers a reliable and beautiful foundation for your next creative adventure.